前回は、サーバーレスのテンプレートを作成しました。
【AWS】サーバーレスのテンプレートを作成する
今回は、作成したテンプレートに DynamoDB を接続します。
DynamoDB を設定するために、serverless.yml を開きます。
まずは、テーブル名を設定します。
provider に、環境変数を設定するために、environmentを入力します。
envirionmentにNOTE_TABLEを作成し、『サービス名-stage 名』にします。
『サービス名-stage 名』にする場合、${}でかこみ、YAML の場所を指定します。
yaml
provider:
name: aws
runtime: nodejs14.x
region: us-west-2
stage: dev
memorySize: 128
timeout: 5
endpointType: regional
lambdaHashingVersion: 20201221
environment:
NOTES_TABLE: ${self:service}-${opt:stage, self:provider.stage}
次に、DynamoDB のテーブルを定義します。
YAML で、resourcesを設定し、さらにResourcesを設定します。
Resourcesの中に、NotesTableを設定します。
yaml
resources:
Resources:
NotesTable:
Type に AWS::DynamoDB::Table を指定します。
※AWS と DynamoDB と Table は、コロン 2 つでくぎられるので、間違えないようにしましょう。
yaml
resources:
Resources:
NotesTable:
Type: AWS::DynamoDB::Table
次に、DeletionPolicyを設定します、これは、スタックが削除された際に、リソースを保持するかバックアップするか指定できます。
保持するために、Retainを指定します。
yaml
resources:
Resources:
NotesTable:
Type: AWS::DynamoDB::Table
DeletionPolicy: Retain
プロパティを設定します。
TableNameは、先程環境設定で作成した、NOTES_TABLEを指定します。
yaml
resources:
Resources:
NotesTable:
Type: AWS::DynamoDB::Table
DeletionPolicy: Retain
Properties:
TableName: ${self:provider.environment.NOTES_TABLE}
キースキーマ属性のデータ型を定義するために、AttributeDefinitionsを設定します。
指定は、user_id、timestamp、note_idとします。
また、user_idは String なので、AttributeType に『S』、
timestampは、Number なので、AttributeType に『N』、
note_idは String なので、AttributeType に『S』を指定します。
yaml
resources:
Resources:
NotesTable:
Type: AWS::DynamoDB::Table
DeletionPolicy: Retain
Properties:
TableName: ${self:provider.environment.NOTES_TABLE}
AttributeDefinitions:
- AttributeName: user_id
AttributeType: S
- AttributeName: timestamp
AttributeType: N
- AttributeName: note_id
AttributeType: S
次に、KeySchema で主キーを設定します。
user_idをパーティションキーとするので、KeyType をHASHとします。
また、timestampをソートキーとするので、KeyType をRANGEとします。
yaml
resources:
Resources:
NotesTable:
Type: AWS::DynamoDB::Table
DeletionPolicy: Retain
Properties:
TableName: ${self:provider.environment.NOTES_TABLE}
AttributeDefinitions:
- AttributeName: user_id
AttributeType: S
- AttributeName: timestamp
AttributeType: N
- AttributeName: note_id
AttributeType: S
KeySchema:
- AttributeName: user_id
KeyType: HASH
- AttributeName: timestamp
KeyType: RANGE
ProvisionedThroughputでどのくらいリソースを提供するかを設定できます。
ReadCapacityUnitsとWriteCapacityUnitsを最小単位の『1』とします。
yaml
resources:
Resources:
NotesTable:
Type: AWS::DynamoDB::Table
DeletionPolicy: Retain
Properties:
TableName: ${self:provider.environment.NOTES_TABLE}
AttributeDefinitions:
- AttributeName: user_id
AttributeType: S
- AttributeName: timestamp
AttributeType: N
- AttributeName: note_id
AttributeType: S
KeySchema:
- AttributeName: user_id
KeyType: HASH
- AttributeName: timestamp
KeyType: RANGE
ProvisionedThroughput:
ReadCapacityUnits: 1
WriteCapacityUnits: 1
クエリを設定するために、セカンダリキーを指定します。
セカンダリキーは、note_idにします。
IndexNameに名前をつけましょう。
yaml
resources:
Resources:
NotesTable:
Type: AWS::DynamoDB::Table
DeletionPolicy: Retain
Properties:
TableName: ${self:provider.environment.NOTES_TABLE}
AttributeDefinitions:
- AttributeName: user_id
AttributeType: S
- AttributeName: timestamp
AttributeType: N
- AttributeName: note_id
AttributeType: S
KeySchema:
- AttributeName: user_id
KeyType: HASH
- AttributeName: timestamp
KeyType: RANGE
ProvisionedThroughput:
ReadCapacityUnits: 1
WriteCapacityUnits: 1
GlobalSecondaryIndexes:
- IndexName: note_id-index
KeySchema:
- AttributeName: note_id
KeyType: HASH
Projectionで、テーブルからインデックスにコピーされる属性を指定します。
ProjectionTypeは、ALLとします。
ProvisionedThroughput は、最小単位の『1』とします。
yaml
resources:
Resources:
NotesTable:
Type: AWS::DynamoDB::Table
DeletionPolicy: Retain
Properties:
TableName: ${self:provider.environment.NOTES_TABLE}
AttributeDefinitions:
- AttributeName: user_id
AttributeType: S
- AttributeName: timestamp
AttributeType: N
- AttributeName: note_id
AttributeType: S
KeySchema:
- AttributeName: user_id
KeyType: HASH
- AttributeName: timestamp
KeyType: RANGE
ProvisionedThroughput:
ReadCapacityUnits: 1
WriteCapacityUnits: 1
GlobalSecondaryIndexes:
- IndexName: note_id-index
KeySchema:
- AttributeName: note_id
KeyType: HASH
Projection:
ProjectionType: ALL
ProvisionedThroughput:
ReadCapacityUnits: 1
WriteCapacityUnits: 1
これで、一通り設定が完了したので、ターミナルでserverless deploy を実行して、デプロイします。
デプロイが完了した後、DynamoDB に接続すると、
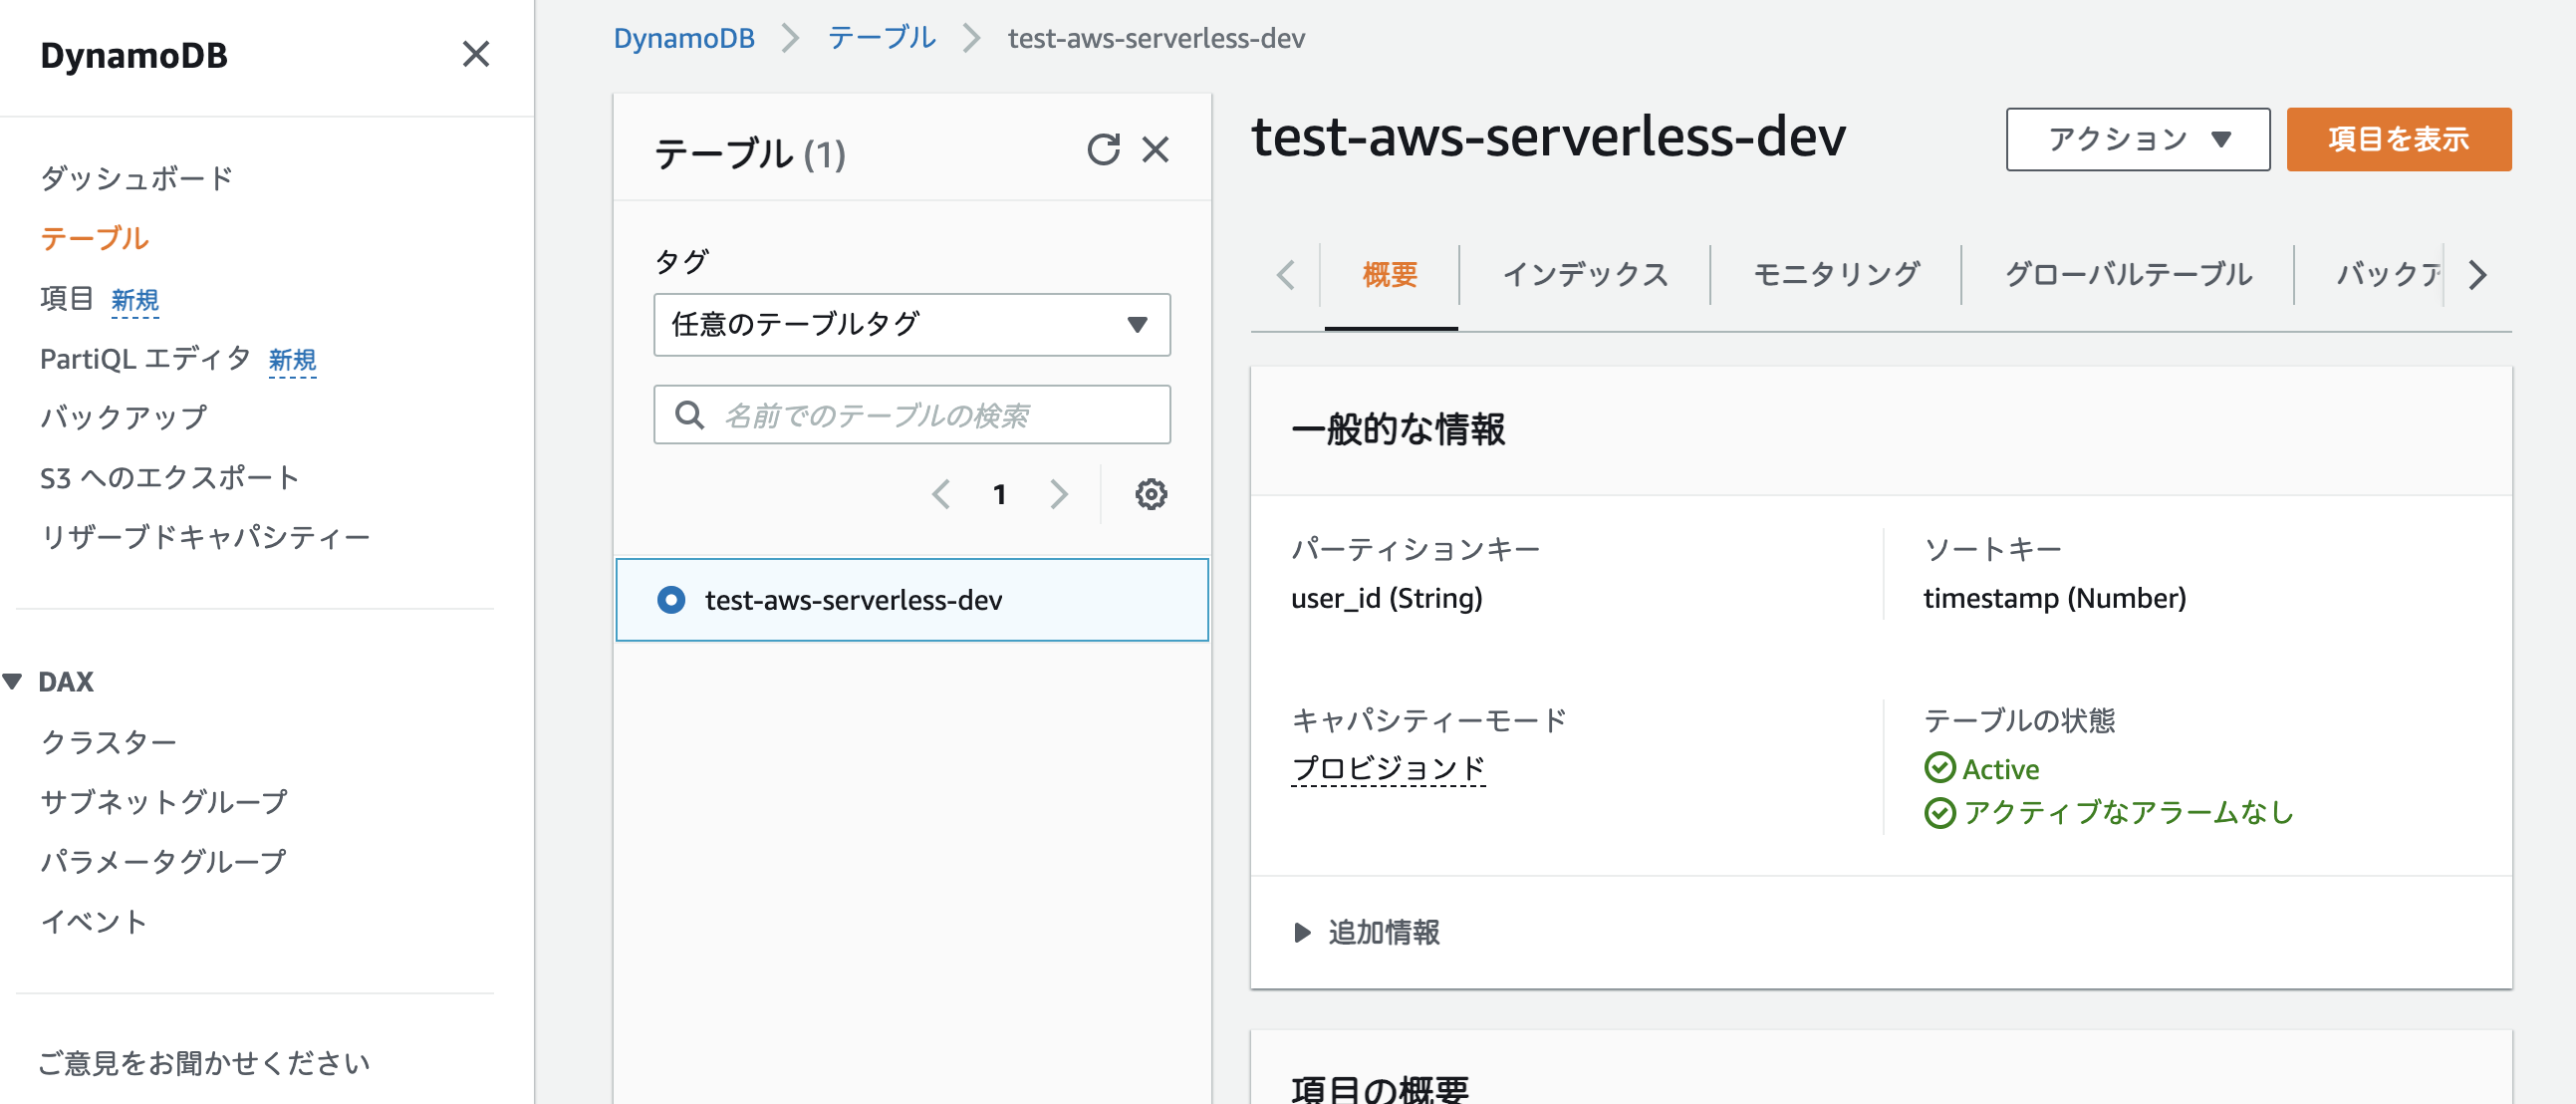
先程設定した、テーブル名が追加されました。
次回は、サーバーレスオフラインを使って、DynamoDB にデータを保存します。
【AWS】サーバーレスオフラインでDynamoDBにデータを保存する